01 Animating a walk is one of the
hardest things to get right.
It’s a process of falling over but catching
yourself just in time. If we don’t put our foot forward then we could fall flat
on our face, we are going through a series of controlled falls.
We lean forward with our upper bodies and
throw out a leg just in time to catch ourselves. The slower we walk, the easier
it is to keep our balance.
Each arm moves in co-ordination with the
opposite leg, this helps us to balance.
As we dip down gravity is doing some of the
work, our arms are at their widest point.

02 We’re less than a centimetre
from stubbing our toe each time we take a step, we lift our foot as little as
possible.
As we rise up, we slow down
Foot glides down heel first for a soft
landing.
All walks are different; no two people in
the world walk the same. When actors are trying to get into character they try
to work out how he/ she walk. You can usually recognise someone’s walk even if
you can’t see them clearly.

03 There is a lot of information
about somebody in their walk and we can read it instantly. One thing to look
for is how much up and down movement there is.

04 Women often take short steps
and walk in a straight line, the legs are closer together and there is very
little up and down movement.

05 Men usually walk with their
legs further apart with lots of up and down head and body movement.
If we trace or rotoscope a walk from some
live action footage it doesn’t work very well and appears to float. In
animation we should caricature real life and increase or exaggerate the ups and
downs. We just don’t get a feeling of weight from smooth, level movement.
06 Its the up and down positions
that give a feeling of weight.
It’s important to understand how a normal
walk works before we can start to build or invent walks of our own.


06A First we’ll make two contact
positions. In a normal, conventional walk the arms oppose the legs to give
balance.


07 Next we’ll put in the passing
position, the middle position, breakdown or half way phase.


08 Because the leg is straight up
on the passing position it lifts the pelvis, body and head slightly higher.
Next the down position where the bent leg
takes the weight.


09 The arm swing is at its widest
on the down position.


10 Next we put in the up position
or the push off. The foot pushing off lifts the pelvis body and head to its
highest position. Then the leg is thrown out to catch us on the contact
position, so we don’t fall flat on our face.


11 This is a walk spread out for
clarity.


12 So in a normal walk the weight
goes down just after the contact position and the weight goes up just after the
passing position.


12A The first thing to do in a
walk is to set a beat. Generally people will walk with two steps per second.
That means from contact to contact there will be 12 frames.


This a little bit difficult to divide up
though and some of the inbetweens will need to be on ‘thirds’.
It’s a lot easier to animate a walk on 16’s
or 8’s (3 steps per second), it’s easier to decide where to put the inbetweens.
At first it’s better to animate a walk
across the page as opposed to trying to animate a cycle.
Just to make sure you understand that
timing is the most important part of the process let’s have a look at some
different ones. Remember we are working with 25 frames per second.
WRITE ON BOARD 4 frames = A very fast run
(6 steps per second)
6 Frames = a run or very fast walk (4 steps
per second)
8 frames = slow run or cartoon walk (3
steps per second)
12 frames = brisk, Natural walk (2 steps
per second)
24 frames = slow step, for an old person’s
walk. (1 step per second)
The Passing Position or Breakdown
13 One way to build a walk is to
start with three drawings, first make the two contact positions
Then put in the middle position, passing
position or breakdown. Raise it up higher than normal,
Try it again but put the passing position
down below the contact positions, this will give us a very cartoony walk but
will still give us a feeling of weight.


14 The crucial thing is where to
put the passing position.


14A Try it with a squash or bent
like a kidney shape.
Or bent backwards
We can delay the foot or do this in a slow
step, it will look like a sneak.
The animation medium is very unusual in
that we can accomplish actions that no human could and make it look convincing.


15 Deciding where to put the
passing position is a key to animating a good walk, then we can decide what to
do with the head, arms feet, the possibilities are endless. The main thing is
to understand the mood of the character in question.


16 Once we’ve settled on a style
of walk for the character we can start to think about counteraction and overlapping action. With a character who has a
belly the stomach mass can go up as the body goes down.
It’s the same with drapery, when the
character goes up the drapery goes down, this applies to things like hair,
breasts and any other appendages.


16A One tricky thing to animate
is a woman walking from a back view. The bum moves in the direction of the
forward foot. Drapery would oppose the hips with a delay and then settle.
17 In the 50’s and 60’s studios
like UPA put all these principles in place then played around with them.


17A Eventually, we find we’ve
come full circle in the realisation that no two characters walk the same.


19 Loosening it up:
Starting with a simple walk, arms opposite
legs, shoulder forward when arms go forward and back when shoulder goes back.
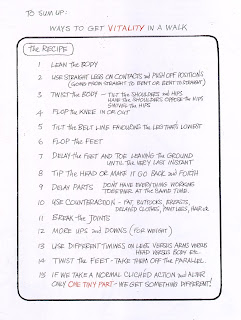

20 Front view, Tilt the
shoulders, it’s taking the basic plan and building on it.
On the passing position the hips and
shoulders are more or less straight.
21 To give more character to a
walk, tilt the head once the hips and shoulders are down.
No comments:
Post a Comment